How to Generate SSH Key And Connect to The Server Without Password
SSH Key-Based Authentication is a method of connecting to the Linux server using pair of a public and private key. One of the keys will be stored into your local computer and another key will be stored into your remote Linux server. Whenever you will try to login to the server from your local computer or from another server using correct key pairs, the remote server will grant you access immediately without asking for password. That's why it's also called passwordless SSH athentication method.
Table of Contents
How SSH Key-Based Authentication Works
- Among the key pairs the public key is stored on the server that you log into, while the private key is stored on your computer.
- When you attempt to log in, the server will check for the public key and then generate a random string and encrypt it using this public key. This encrypted message can only be decrypted with the associated private key.
- The server will send this encrypted message to your computer. Upon receipt of the message, your computer will decrypt it using the private key and send this message back to the server. If everything matches up, your will be connected to your server over SSH without entering your password.
The procedure of configuring SSH Key-Based Authentication is same for all Linux distributions. You can simply follow the following instructions if you are using Ubuntu, CentOS, RockyLinux or any other Linux OS on your server.
First Step : Connect to The Server
In order to configure SSH Key Based Authentication we need to login to the server via SSH first. If you don't know how to connect to your Linux server over SSH please follow my previous tutorials in this series : Connecting to the Server
Second Step : Generating SSH Key-Pair
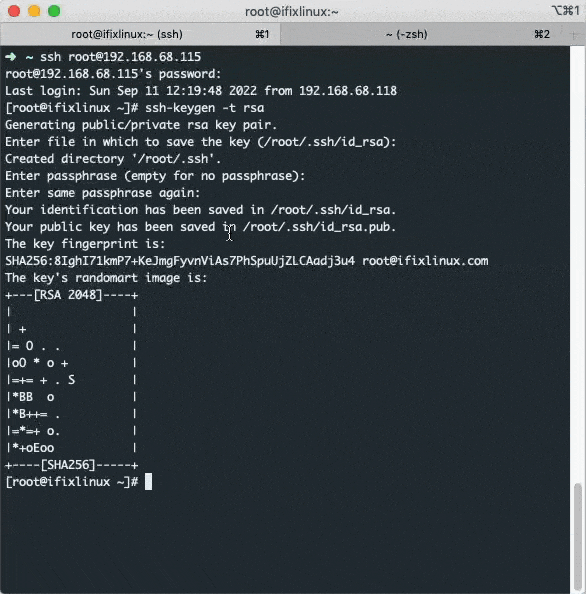
When you are logged into SSH type or copy-paste the following on the Terminal and hit enter.
1ssh-keygen -t rsa
You will be prompted to set the Key Pair location and name. I recommend you use the default location. Just hit enter twice. You will be then prompted to enter passphrase. We will not be using any passphrase for our keys so hit enter again twice.
Sample outputs and video demonstration:
 1[root@ifixlinux ~]# ssh-keygen -t rsa
 2Generating public/private rsa key pair.
 3Enter file in which to save the key (/root/.ssh/id_rsa):
 4Created directory '/root/.ssh'.
 5Enter passphrase (empty for no passphrase):
 6Enter same passphrase again:
 7Your identification has been saved in /root/.ssh/id_rsa.
 8Your public key has been saved in /root/.ssh/id_rsa.pub.
 9The key fingerprint is:
10SHA256:8IghI71kmP7+KeJmgFyvnViAs7PhSpuUjZLCAadj3u4 [email protected]
11The key's randomart image is:
12+---[RSA 2048]----+
13|                 |
14| +               |
15|= O . .          |
16|oO * o +         |
17|=+= + . S        |
18|*BB  o           |
19|*B++= .          |
20|=*=+ o.          |
21|*+oEoo           |
22+----[SHA256]-----+
23[root@ifixlinux ~]#
If you see outputs similar to the one shown above, your SSH Key Pair has been generated and your public key and private keys have been saved at /root/.ssh/id_rsa.pub and /root/.ssh/id_rsa these locations respectively. Here id_rsa.pub is your public key and id_rsa is your private key. You need to place the Public Key on your remote server and Private Key on your computer from where you will be establishing connection to the server.
Third Step : Placing The SSH Key Pairs at The Right Places
Things to Do
Now we have the public and private key pairs generated and stored in
/root/.ssh/this directory on the server. We need to create a file named authorized_keys in/root/.ssh/authorized_kyesand copy paste the contents of/root/.ssh/id_rsa.pubinto it. And then create a file on our computer with the contents of the private key file/root/.ssh/id_rsa.pub. In this example I have created a file named private_key.txt on my computer at/Downloads/private_key.txtwith the contents of the private key file that was generated on the server. We also need to set correct permission for authorized_keys and private_key.txt files.
Dealing with the public key file id_rsa.pub (inside server)
1[root@ifixlinux ~]# cat /root/.ssh/id_rsa.pub
2ssh-rsa AAAAB3NzaC1yc2EAAAADAQABAAABAQDSA1YcaUyATc2XyDI9uS/hNwnhaLE1A6v69b/8Rsl4KbBWbP+0YjH3tmOY/8oNebzn4ucIoID3NpwanNCKOr9wgcH8NQhFTSa1nCHy3a0cT97xjFKrUUw4yR4n80V4iAQfhqdYg3RX+zqNqd4OSPp+61Db+/yXbi8QdJldqw8VccqJ2fvycXuwOkTy1PbF5is7xqZPeT71g4TJvtFwQJvV4RDyOku9e+iihEuF4wwW9esy9Lc92YAB8yL/Aa/cCjrRmJ8PwhNmjaCUbdxGpnvFWv6TY4ldxhnGqVdg7JrVL+CB7VVTypIB3uG++zu3GDccLIKJix03ZnZ6neuIqdZP [email protected]
3[root@ifixlinux ~]# vi /root/.ssh/authorized_keys
4[root@ifixlinux ~]# chmod 700 /root/.ssh/authorized_keys
Here I used the cat command to read and copy the contents from the public key file id_rsa.pub . Then pasted the contents into the file /root/.ssh/authorized_keys using vim editor. To create or edit files on Linux you can use vim, nano or any other text editor that you prefer. And then set the permission for the file authorized_keys to 700 using chmod command chmod 700 /root/.ssh/authorized_keys . At this stage we are done with the public key part.
Dealing with the private key file id_rsa (on your computer)
 1[root@ifixlinux ~]# cat /root/.ssh/id_rsa
 2-----BEGIN RSA PRIVATE KEY-----
 3MIIEowIBAAKCAQEA0gNWHGlMgE3Nl8gyPbkv4TcJ4WixNQOr+vW//EbJeCmwVmz/
 4tGIx97ZjmP/KDXm85+LnCKCA9zacGpzQijq/cIHB/DUIRU0mtZwh8t2tHE/e8YxS
 5q1FMOMkeJ/NFeIgEH4anWIN0V/s6janeDkj6futQ2/v8l24vEHSZXasPFXHKidn7
 68nF7sDpE8tT2xeYrO8amT3k+9YOEyb7RcECb1eEQ8jpLvXvoooRLheMMFvXrMvS3
 7PdmAAfMi/wGv3Ao60ZifD8ITZo2glG3cRqZ7xVr+k2OJXcYZxqlXYOya1S/gge1V
 8U8qSAd7hvvs7txg3HCyCiYsdN2Z2ep3riKnWTwIDAQABAoIBAHuNcu+sE1G4dCfD
 9o6skc8KvuqReD0L9MgSm55fnnUeQXym5XoYk7vio2Nd+RMTAxh42I22z36uQ+S2+
107AEmptHtxM439PGwfgGCJYbYW6u4YZUB1PDtF0ahK5idSlWqz6Isee9dBulr5/rH
114NfOn3BjyGJjUStVq2Km9kNhC7K0+YNwQ4goLwbhj5ObRKuRpVQauuyte+TQhWUI
12YhLKTWs69WAoh9t5y5QZrHAQT1A9zhGJ7oRUzgAwiM6HsBcZsWFevSMIhQP3l3hE
1362Yzi/kupIzKYbpJL8lw6ZjBn1Y0muIaBtpoEsltO1tJ1/3vyxIW28zDFClONR2V
14v/rnO0ECgYEA/ESTaDd9uY7FKmvIkozHx2/UfBgBT3ulp1gzG6uzYigO1eyPWY0F
15H8TuuKH2rtIYZ3i0btAv3mVdFbIoBULbY44NVgof3nZrNqnSA3mkXcMWuS3rvy77
16/DFf5ZsPmSGn4olFnYDFx8nwwTivzZQ0aqAoQk9cuu0QvP7UEfsj9ZcCgYEA1R66
17JCClyYUuhUk6LU6rRzUyrr+2WEL+VOvPfnOLf2K142keIZ+MYhja6kihEwiYlEcs
18BKlzb5hLGLM7JXDUD08fd29aZDxoPZBwbOzHkTdJhKnB86L2/HJpG97p1XtptTV3
19/FEFSV814jbZcdshJJFANULR+tdmOl/ox8fZ7AkCgYEAkX5jngnTI0AqiwrbBVrY
20pjfjTybxKoxfwCJoZ58huIzt8YecLcPdnrMQE8Cl67IUjSjat8autQ+1HhxAZLho
21nASDwInaU43sy/wpugNgPwuTgX3wp7VLc+puKpjB6Em28DrHwc1RRKc9idNN4b2G
22dbClR4lKLC0qKDa4zR4RYUUCgYAFwlXPYh54yqOOMINk9ApG21YqSL35tp2+17x8
23s0yivZ0irxWEXRZjFD7eM+Y+aG4PG7lByv52lov49+byRRFF9KJqDNVJfiRm/X88
24Qk3GS9MtxZSbK902xzS17xksjrA1mGNMqzfUWsFPAqJvpDdKEK7Gga7A848spqjY
25tTrbWQKBgGDUZHYjo5WXqRn/De7Z35+ZAAjko7zQrTTh3ejLRnrQjMP6gUXIqjEo
26VIFkRJIFzOY0zEph6Gqe/2nx4QVHN71NDn9KUYSeclTlvlkBk0UEG3DKefnPBPO+
27OiDHl9mvMzfZV+6kYvSeDqUgx2RNAG6gq+Cfo++Xg4T1lTOiB3H4
28-----END RSA PRIVATE KEY-----
29[root@ifixlinux ~]#
Now let's move to the Private Key part. We need to copy the contents from the private key file /root/.ssh/id_rsa to a file on our computer remember? The contents of your private key should be something similar to the output shown above. Now create a file on your computer with any name, In this example I used private_key.txt as the file name and pasted the contents of id_rsa file into it. And then set the permission for this file to 700. If you have followed the above instructions correctly, you are done with the private key part.
Now to login to the server with your SSH Keys, type ssh -i private_key.txt [email protected] on Terminal App on Mac/Linux or PowerShell on Windows and you will be logged into the server instantly without requiring password.
1➜  ~ ssh -i private_key.txt [email protected]
2Last login: Sun Sep 11 12:21:46 2022 from 192.168.68.118
3[root@ifixlinux ~]# hostname
4ifixlinux.com
5[root@ifixlinux ~]#
- Remember to replace private_key.txt with the file name that you created on your computer.
- Remember to change the working directory to the directory where you saved the private key file or use full path.
- Remember to replace xxx.xxx.xxx.xxx with your Server IP.
Here's a video demonstration of the steps I described above
This article is a part of a series.
- Part 1: How to Use SSH to Connect to a Linux Server
- Part 2: How to Connect to Linux Server From Mac or Linux
- Part 3: How to Connect to Linux Server From Windows
- Part 4: Use Your Android Phone or Tab to Connect to Linux Server via SSH
- Part 5: How to Connect to SSH on Different Port (Port other than 22)
- Part 6: This Article